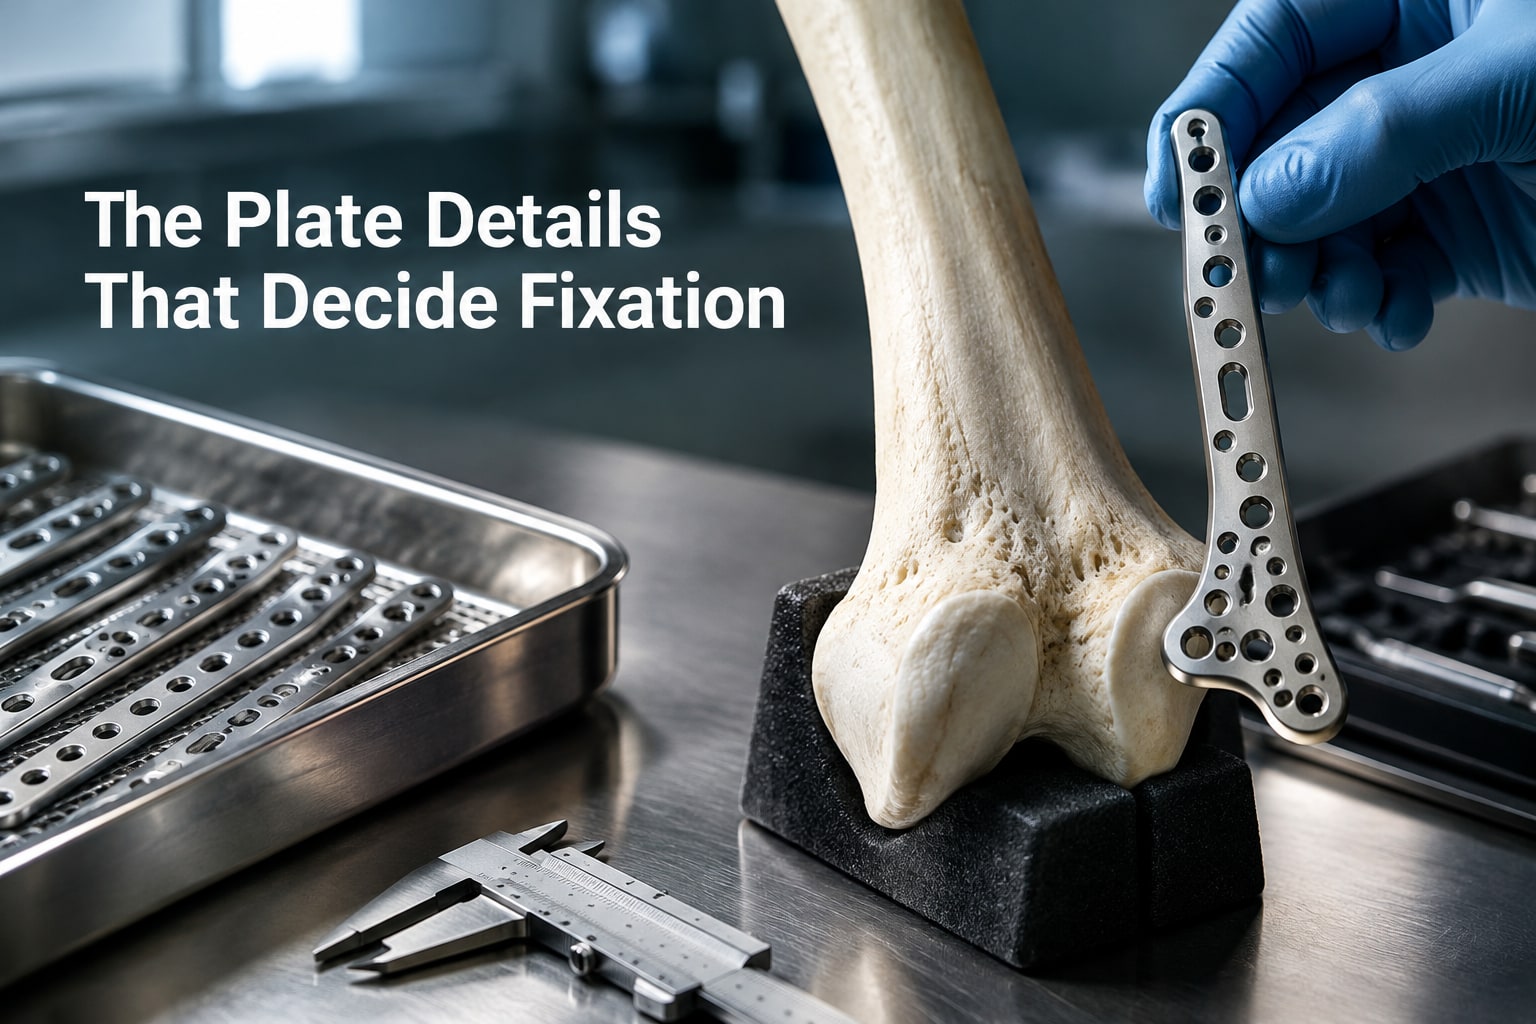
A plate labelled with more holes is not automatically the better choice: the count may combine shaft, compression, threaded and distal cluster holes, while only some holes provide useful fixation for a specific fracture. By separating hole types, plate position, laterality, distal screw trajectories and construct requirements, you can compare options without ordering the wrong side or overestimating fixation capacity.
Key takeaways
- Treat hole counts as manufacturer-specific, not usable screw counts.
- Match plate length to fracture extent and the fixation construct required.
- Choose column-specific designs for the fracture’s fragments and available bone.
- Confirm left-right fit, dorsolateral contour and screw compatibility before sterilisation.
What does a distal humerus plate’s hole count actually include?
A 3-, 4-, 5- or 14-hole label tells you the number of openings counted by that manufacturer, not the number of usable fixation screws. The total may include threaded locking holes, non-threaded compression holes, combination holes and the small distal screw cluster.
Read the specification as a breakdown, not a headline. A fully threaded locking hole provides fixed-angle fixation; it does not provide the same interfragmentary compression as an eccentric conventional screw in a compression slot. A combination hole may accept either screw, depending on which section you use.
- Record total holes and classify them as distal locking, shaft locking, compression or combination holes.
- Record the number of distal screws, their diameter and their fixed-angle trajectories separately from the shaft capacity. A 2.7 mm distal locking screw paired with a 3.5 mm shaft screw is common in a 3.5 mm plate family.
- Confirm available lengths, left or right laterality, anatomical position and whether the plate is designed for a medial partner. Count secure screws above and below the fracture, not empty openings.
| Plate label | What the count may include | What to compare |
|---|---|---|
| 3 or 4 holes | Short shaft holes plus distal cluster | Metaphyseal reach and proximal purchase |
| 5 holes | Additional shaft or combination holes | Compression and locking choices |
| 14 holes | Long shaft series openings | Usable length, not automatic stability |
This multidimensional distal humerus plate options comparison prevents the total from disguising limited distal humerus locking plate holes or inadequate shaft fixation.
How should plate length match the fracture and the required fixation?
Plate length should match the fracture’s proximal reach, not a preferred hole count. For a distal humerus plate options comparison, ask how much intact metaphysis remains, how far the fracture extends into the shaft, and where secure screws can sit above and below the fracture.
| Length | Best fit | Main limitation |
|---|---|---|
| 3-hole | Very distal, short-segment fracture with adequate distal purchase | Too little shaft engagement for a proximal or comminuted extension |
| 4- or 5-hole | Metaphyseal fracture with moderate proximal extension | May not provide enough working length for bridge fixation |
| 6- to 8-hole | Fracture extending into the distal shaft or requiring broader bridging | Needs sufficient exposed, intact shaft for seating and screws |
| 9- to 14-hole | Long proximal extension, comminution, or a planned long bridge construct | Adds length without value if the available shaft is short or soft tissue is limited |
Count the screws that will achieve secure purchase, not the holes printed in the catalogue. The distal cluster must accept independent screws into the condylar fragments, while the shaft side needs enough bicortical or locking fixation above the fracture.
- Choose a longer plate when reduction requires spanning comminution or placing screws away from a disrupted metaphysis.
- Choose a shorter plate when the fracture is distal and a longer plate would cross unavailable or poorly contoured shaft.
- Confirm the plate leaves room for the planned reduction, screw trajectories and soft-tissue envelope. A long plate that cannot gain secure proximal fixation is only extra metal.
Which distal humerus plate design fits the column and fragment pattern?
Match the plate to the fractured column and the fragment pattern, not to the largest hole count. A useful distal humerus plate options comparison asks where the plate sits, which fragments its distal screws capture, and whether another plate is needed.
A dorsolateral humerus plate is not automatically equivalent to a lateral plate: their footprints and screw trajectories can differ.
| Option | Anatomical position and role | Best fit |
|---|---|---|
| Lateral | Outer lateral column | Lateral-column fractures with a stable medial column |
| Dorsolateral or posterolateral | Posterior surface of the lateral column | Capitellar and posterolateral fragments, or fracture lines needing posterior support |
| Dorsolateral with lateral support | Posterolateral surface with added lateral-column buttress | Combined posterior and lateral-column fragments |
| Medial | Medial column | Medial-column fractures; commonly paired with a lateral or dorsolateral plate |
| Extra-articular | Shaft or metaphyseal surface away from the joint | Extra-articular distal fractures without an articular fragment requiring direct capture |
| Metaphyseal | Broad distal metaphyseal region | Short distal segments and metaphyseal comminution, when its screw cluster reaches the fragments |
A single lateral plate is not a like-for-like substitute for dual-column fixation in an unstable bicondylar fracture. Consider medial-lateral fixation when both columns are disrupted; a medial plate controls the medial column while a lateral or dorsolateral plate supports the lateral side.
A dorsolateral dual-column strategy requires a design and screw pattern that genuinely capture both columns, not merely a plate with more holes.
Check the distal cluster rather than total holes: shaft combination holes add length but do not create independent fixation in each condylar fragment.
How do you confirm the correct side and dorsolateral fit before sterilisation?
A left right humerus plate is identified from the patient’s anatomy, not from the surgeon’s own left and right. With the arm positioned as for surgery, match the catalogue laterality and part number to the operative side; never reverse a plate because its hole pattern appears symmetrical.
1. Place the unsterilised plate on the corresponding bone model or intact contralateral imaging. Confirm that its shaft curvature follows the distal humerus without rocking, gapping, or forcing the plate into position.
2. Check the distal contour against the lateral column, capitellum, radial head region, and olecranon fossa. A dorsolateral humerus plate should sit on the posterior aspect of the lateral column, support the capitellar fracture line, and avoid impinging on the radial head or filling the olecranon fossa during flexion.
3. Inspect every distal screw trajectory on the manufacturer’s guide or template. Confirm that locking directions support the distal articular block without entering the joint, crossing an unintended fragment, or projecting toward the radial head.
4. Trace the plate edge around the lateral epicondyle and posterior column, then check clearance for the ulnar nerve. A plate that requires excessive soft-tissue pressure, sits over the nerve path, or leaves the lateral column unsupported is the wrong fit.
Record the laterality, plate length, screw diameters, and catalogue number before sterilisation. A universal plate still needs confirmation that its reversed orientation preserves suitable distal trajectories.
What should buyers verify about distal screws and the plate supplier?
A plate’s total hole count does not prove its distal fixation capacity. Ask the supplier to separate distal humerus locking plate holes, shaft holes, combination holes and non-threaded compression holes, then match each hole to an approved screw.
1. Confirm the distal screw diameter and capacity. A 2.7 mm distal locking screw paired with a 3.5 mm shaft screw is a common arrangement, but do not assume it applies to every 3.5 mm plate family. Request the maximum number of distal screws and the screw-length range.
2. Check joint clearance before sterilisation. Review the fixed-angle trajectories on a dimensional drawing, then confirm under fluoroscopy that screws will not enter the capitellum, trochlea or olecranon fossa. Ask for compatible drill guides and guide-wire or drill-stop specifications; a guide that fits the plate but changes the approved trajectory is not equivalent.
3. Verify locking compatibility in writing. The screw diameter alone is insufficient: locking-thread geometry, head interface, permitted angulation, hole spacing and approved screw family must match. Do not substitute a conventional screw from another system.
4. Require traceability and supply documents. Each left or right plate needs a catalogue number, lot or batch number, material designation, length, revision history, instructions for use, implant-screw compatibility chart and certificate of conformity. Ask for replacement-part consistency across matching screw kits.
5. For Komal Health Care Pvt Ltd, compare catalogue numbers, laterality, hole maps and documentation—not merely the advertised size range—before approving a purchase.
Related products
 | Orthopedic Implants Locking Distal Humerus Plate , DorsoLateral We Are Manufacturer Locking Distal Humerus Plate , DorsoLateral . Sizes is done From 3 Hole To 14 Hole , Difference of 1 hole in Left & Right Sides . View product → |
 | Orthopedic Implants Locking Distal Humrus Plate . DorsoLateral With lateral Support We Are Manufacturer Of Locking distal Humrus Plate , DorsoLateral With lateral Support . Size Is From 3 Hole To 14 Holes & 1 Hole Difference . View product → |
Frequently asked questions
What does a distal humerus plate’s hole count include?
The count can include threaded locking holes, non-threaded compression holes, combination holes and the small distal screw cluster. It does not equal the number of usable screws.
How should plate length match the fracture and required fixation?
Select a length that spans the fracture zone and provides enough proximal fixation points without interfering with nearby joints, soft tissue or other implants.
Which distal humerus plate design fits the column and fragment pattern?
Use a design that supports the injured medial or lateral column, both columns, or specific distal fragments. Compare the plate’s distal screw trajectory with the fragments shown on imaging.
How do you confirm the correct side and dorsolateral fit?
Check the label for left or right humerus, place the plate on the matching bone model or anatomic side, and inspect the dorsolateral contour before sterilisation.
What should buyers verify about distal screws and the plate supplier?
Confirm screw diameter, length range, locking or non-locking compatibility, thread engagement and driver requirements. Ask the supplier for drawings, material details, traceability records and lot documentation.
Related products
 | Locking Distal Radius Plate , Extra - Articular We Are Manufacturer Of Locking Distal Radius Plate , Extra - Articular . Size Is 3/5Holes , 5/4Holes & 5/5Holes , In Left & Right Sides . View product → |
 | Orthopedic Implants LCP Extra Articular Distal Humerus Plate We Are Manufacturer Of LCP Extra Articular Distal Humerus Plate . Size Is from 4 Hole To 14 Holes , Difference of 1 hole . View product → |
 | LCP Methaphyseal Plates For Distal , Medial Humerus We Are Manufacturer Of LCP Methaphyseal Plates For Distal , Medial Humerus . Size Are From 3 Hole To 14 Hole , Difference Of 1 Hole . View product → |